Instructions for pumping down the dewar
Checklist for experts -- others read below first!!
-
Place the vacuum pump cart on the square marked on the carpet. Put
the telescope at HA 6.5 hours W and Dec 30 degrees. Then connect the
pump cart's power strip to the UPS.
-
Before connecting the dewar valve to the valve actuator connected
to the vacuum system, clean and blow off both valves. Unscrew the
large nut on the end of the actuator a few turns to remove the
pressure from the O-ring. Align the actuator and dewar valve, then
slide the actuator over the valve on the dewar. Use the small black
wrench to tighten up, but don't yet engage the plunger which opens the
valve.
-
On the cathode controller, first make sure "filament" and "degas" are
switched off. Turn on both high and low pressure meters.
-
Gently open the main vacuum valve about xx turns.
-
Turn the pump on.
-
When the high pressure meter reads "0", turn the filament on.
-
When the pressure gets to around 8E-5 torr, engage the valve on the
dewar: push the plunger in slowly. When only about twice the taped-up
distance on the plunger rod is showing, you can start screwing the rod
into the plug. When it is fully screwed in, pull the plunger up very
slowly to crack the seal to the dewar. The seal is broken when
about 2 inches of the plunger show.
-
You are shooting for something on the order of 5E-5. This will take several hours. Shut the
filament off, and periodically turn it on to check the pressure. The pressure
fluctuates when the filament is turned on, however, and will take a bit to
equilibriate. So it is okay to leave the filament on, but just keep checking
it...
-
When you are satisfied with the pressure, push the plunger back down
into the dewar slowly. If you need to, rotate clockwise while
pushing, until only the taped-up part of the rod is showing. Then
close the main vacuum valve and unscrew the plunger rod from the plug,
moving the top of the plunger anti-clockwise with no outward motion.
Then pull the plunger out all the way. Then, turn the filament off,
the gauge power off, and the vacuum pump off. Disconnect the actuator
from the valve by unscrewing the large nut with the black wrench.
General comments
NEVER pump down the dewar when it is
cold. When it is cold, the vacuum inside is less than E-6 torr due to
cryo-pumping (molecules freezing onto the walls). Wait at least an
hour after the CCD has reached room temperature.
Our main priority here is to prevent the destruction of the CCD (the
most expensive bit). The blast of air and the shock wave caused by
rapid changes in pressure from evacuated to atmospheric pressure can
destroy the CCD, either by tearing off bond wires or shattering the
CCD surface itself.
Therefore we need to ensure that the dewar is fully closed before
disconnecting or turning off the vacuum pump. The vacuum pump can also
be destroyed by this blast of air, which can tear the vanes off the
turbo-molecular pump (just like the effect of throwing frozen chickens
into a jet engine).
Always put on clean rubber gloves when handling the vacuum pump fittings,
because even small bits of dirt or grease can contaminate the system
and/or cause vacuum leaks.
Connecting up the vacuum pump
-
Place the vacuum pump cart on the square marked on the carpet. Put
the telescope at HA 6 h 20m W and Dec 27.5 degrees. Then connect the
pump cart's power strip to the extension cord connected to the UPS
under the desk. This cord is labelled "UPS".
-
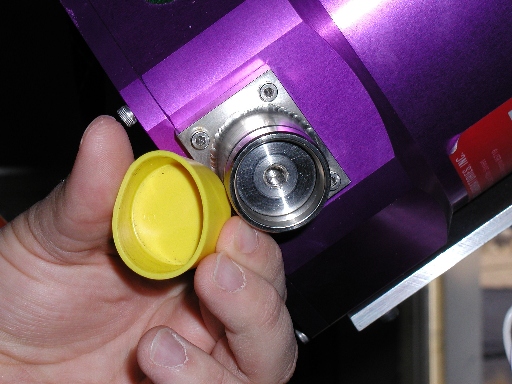
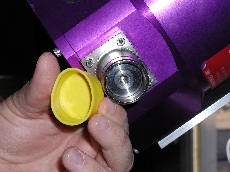 The next step is to connect the vacuum system to the dewar. Remove the
plastic cover from the dewar vacuum valve.
The next step is to connect the vacuum system to the dewar. Remove the
plastic cover from the dewar vacuum valve.
-
Wipe the surface of the
valve with a dry Kimwipe. You need to wipe all the bits that will be
inside when the valve actuator is connected: the rim, all of the
inside bits that are visible, and the part of the outside of the valve
that the actuator valve screws into. Blow off any dust with the air gun.
Remove the plastic cover from the valve actuator at the end of the
stainless steel vacuum pump hose. Gently wipe the inside of the
actuator (including the O-ring) with a Kimwipe and blow off any dust
with the air gun.
-
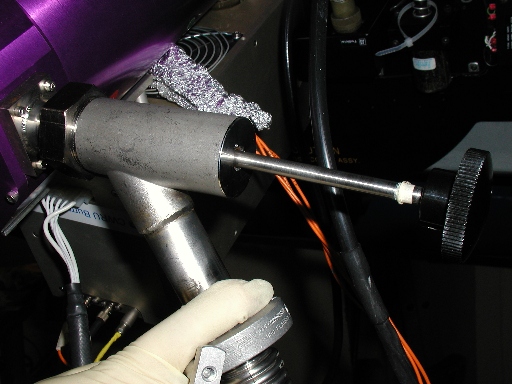
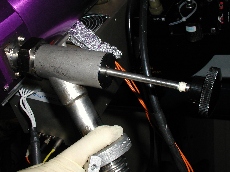 Unscrew the large nut on the end of the actuator a few turns to remove
the pressure from the O-ring so it can easily slide over the valve on
the dewar. Make sure the plunger is pulled out. Align the actuator and dewar
valve, and then gently slide the actuator over the valve on the dewar, as far as
it will go. Be careful not to scratch the dewar valve with the metal of the actuator.
Any scratches can cause a vacuum leak.
Unscrew the large nut on the end of the actuator a few turns to remove
the pressure from the O-ring so it can easily slide over the valve on
the dewar. Make sure the plunger is pulled out. Align the actuator and dewar
valve, and then gently slide the actuator over the valve on the dewar, as far as
it will go. Be careful not to scratch the dewar valve with the metal of the actuator.
Any scratches can cause a vacuum leak.
-
Use the small black wrench to tighten up (counter-clockwise when
looking down the plunger at the dewar). Hold the actuator assembly
with one hand while tightening the nut with the other, being careful
not to use too much force. When fully tightened, you will not be able
to move the actuator in or out, but it can still rotate with respect
to the dewar valve, and a tiny bit of wiggling is also allowable.
Tightening the nut squeezes the O-ring into a groove on the valve to
form the vacuum seal. This feels different from tightening a threaded
screw where metal contacts metal.
Don't yet engage the plunger which opens the valve. The valve
fittings (O-ring, etc) are very sensitive to dirt, so use caution when
handling them.
-
You may now need to adjust the position of the cart slightly to minimize
any twisting in the stainless-steel vacuum cable.
-
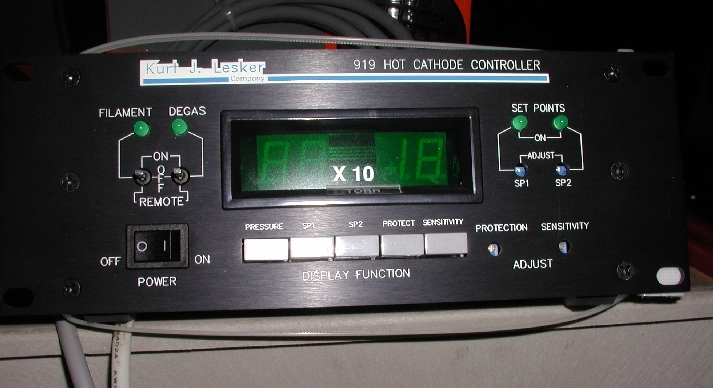
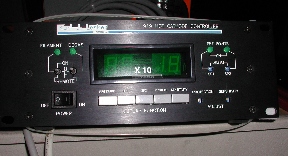 Now that we are properly connected, we can power up the vacuum
system. On the cathode controller, first make sure "filament" and
"degas" are switched off (middle position).
Now that we are properly connected, we can power up the vacuum
system. On the cathode controller, first make sure "filament" and
"degas" are switched off (middle position).
-
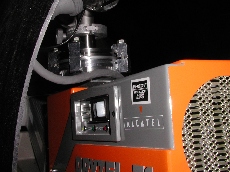
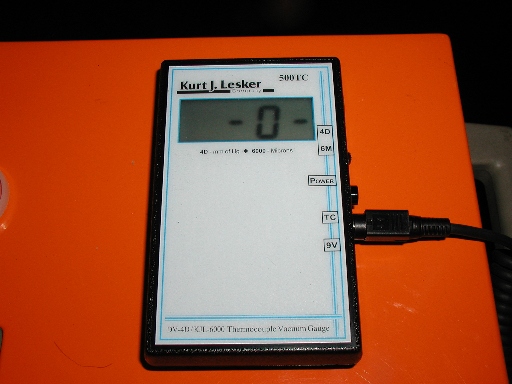
 Turn on both meters. The little LCD one measures high pressure, the
bigger LED one (shown right) measures low pressure.
Turn on both meters. The little LCD one measures high pressure, the
bigger LED one (shown right) measures low pressure.
-
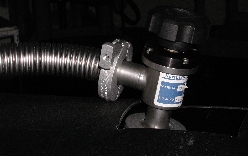 Gently open the main vacuum valve (which projects from the top of the
housing on the vacuum pump) about 10 turns. (Don't over-tighten
this valve either opening or closing it.)
Gently open the main vacuum valve (which projects from the top of the
housing on the vacuum pump) about 10 turns. (Don't over-tighten
this valve either opening or closing it.)
-
At this stage we will be pumping down the vacuum system and the stainless
steel line to the dewar, but not the dewar itself.
The reason we open the main valve at this stage is so we can get the
vacuum system to a higher vacuum than the dewar's before opening the
dewar valve. Whenever the dewar is on the telescope, it has a vacuum
inside; we always want any air movement to be OUT of the dewar to
protect the CCD and keep the dewar clean inside.
-
 Double-check that everything has been done correctly, then turn
the pump on.
Double-check that everything has been done correctly, then turn
the pump on.
-
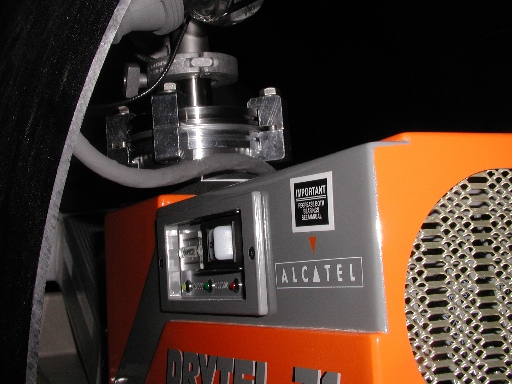
The backing pump starts first and produces a coarse vacuum. The yellow
LED below the on switch is on at this stage. You'll hear a click after a
few sec and hear the whine of the turbo-molecular pump spinning up to
27,000 rpm. When the pump has reached full speed the green LED will
light. If the red LED shows, turn off the the pump, wait a few
seconds, and try again.
-
When the high pressure meter reads "0", turn the filament (of the hot
cathode which operates the low pressure meter) on. This should
take a couple of minutes -- in the absence of the high pressure meter,
just wait a bit (as long as you are sure everything else is behaving normally!).
It's normal for the filament to fluctuate when it is first turned on. It
will automatically turn off if the pressure is above 5E-3 torr.
-
After a bit of fluctuation, the low pressure meter should start
showing a steady decrease in pressure. When it gets to around 8E-5
torr, engage the valve on the dewar as follows.
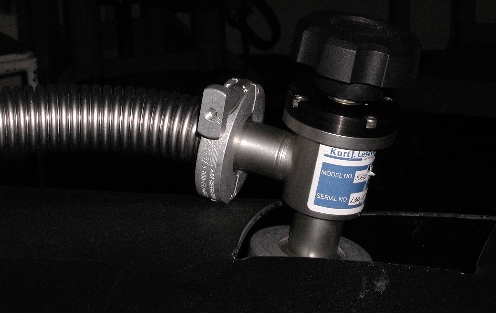
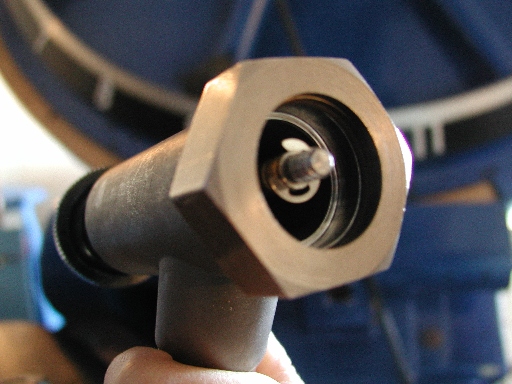
 The fitting that connects the stainless steel vacuum hose to the dewar
has a plug with 2 O-rings around the outside:
The fitting that connects the stainless steel vacuum hose to the dewar
has a plug with 2 O-rings around the outside:
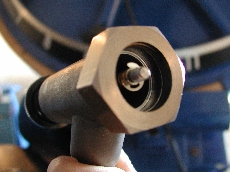 The plunger has a rod on the inside which screws into the plug and can
then be used to pull the plug out.
The plunger has a rod on the inside which screws into the plug and can
then be used to pull the plug out.
Moving the plunger on the dewar vacuum valve knocks off molecules
which can leak past the O-ring, so the pressure increases
temporarily. If you move it slowly, the vacuum pump can keep up.
Push the plunger in slowly.
When only about twice the taped-up distance on the plunger rod is
showing, you have reached the position where you can start screwing the rod
into the plug. You may need to wiggle the rod slightly to engage the
screw thread. When all you can see of the plunger rod is the taped-up
portion, you have screwed the plunger fully into the plug.
Then pull the plunger up very slowly to remove the plug from the
valve and hence crack the seal to the dewar itself. The seal is broken
when about 2 inches of the plunger show. You'll see the low pressure
meter jump up significantly (few E-3 torr).
-
You are shooting for something on the order of 5E-5. This will take
several hours. Shut the filament off, and then periodically turn it on
to check the pressure.
Disconnecting the vacuum pump
-
When you are satisfied with the pressure, push the plunger back down
into the dewar slowly, while watching the pressure.
Moving the plunger on the dewar vacuum valve knocks off molecules
which can leak past the O-ring, so the pressure increases
temporarily. If you move it slowly, the vacuum pump can keep up.
-
When only about twice the taped-up distance on the plunger rod is
showing, you have reached the position where you are seating the
plug-with-O-ring which is screwed onto the end of the rod in the
valve itself. If you can't push it in easily, rotate clockwise while
pushing, until only the taped-up part of the rod is showing.
-
When you have reached this hard stop,
you can check that the plug is in the valve and the rod is unscrewed
in two ways:
- you can wiggle the handle more freely in any direction
- if you push the rod back in, it will come to a hard stop with 1/4"
clear metal protruding.
While you are doing this, the vacuum pressure should have decreased
because you are only pumping the hose, not the dewar. We can use the
pressure as a final check that the dewar valve is closed following the
next step. Slowly unscrew the plunger rod from the plug, moving the
top of the plunger anti-clockwise with no outward motion. The rod
will unscrew about 1/4", and then you will feel it turning against the
top of the threads. If you have not managed to detach the rod from
the plug, you will notice at this stage that the pressure reading will
increase as you move the rod outwards. If the pressure remains
unchanged, just pull the plunger out all the way -- it should move more freely now.
-
Then close the main vacuum valve (thus protecting the vacuum pump).
Then, turn the filament off, the gauge power off, and the vacuum pump
off.
-
Disconnect the actuator from the valve by unscrewing the large nut
with the black wrench. Replace plastic covers on actuator and valve.
Don't move the cart until about 5 mins after the turbine has spun down.
[In future, add paragraph about bleeding air into system slowly using
a to-be-purchased bleed valve and watching pressure come up to 1 atm
on high-pressure meter.]
Troubleshooting
-
If the pressure continues to fluctuate by a factor of 5 or more after
several hours of pumping, there is probably a leak somewhere.
-
If the pressure does not drop much below few x 10-3, double check that
the turbine is in fact running. The green light should be lit on the
side of the pump.
-
You can check which side of the main vacuum valve (black handle
directly above the vacuum pump) the leak is on by closing it. If the
pressure decreases after closing, then the problem is on the dewar
side of the main valve. Next, push the plunger on the dewar vacuum
valve fully in. Open the main valve slowly. Is the vacuum reading
higher, or fluctuating slowly? If so, the leak is in the hose. If not,
the problem is in the dewar itself.
Table of Contents
Last Updated: April 2003
 The next step is to connect the vacuum system to the dewar. Remove the
plastic cover from the dewar vacuum valve.
The next step is to connect the vacuum system to the dewar. Remove the
plastic cover from the dewar vacuum valve.
 Unscrew the large nut on the end of the actuator a few turns to remove
the pressure from the O-ring so it can easily slide over the valve on
the dewar. Make sure the plunger is pulled out. Align the actuator and dewar
valve, and then gently slide the actuator over the valve on the dewar, as far as
it will go. Be careful not to scratch the dewar valve with the metal of the actuator.
Any scratches can cause a vacuum leak.
Unscrew the large nut on the end of the actuator a few turns to remove
the pressure from the O-ring so it can easily slide over the valve on
the dewar. Make sure the plunger is pulled out. Align the actuator and dewar
valve, and then gently slide the actuator over the valve on the dewar, as far as
it will go. Be careful not to scratch the dewar valve with the metal of the actuator.
Any scratches can cause a vacuum leak.
 Now that we are properly connected, we can power up the vacuum
system. On the cathode controller, first make sure "filament" and
"degas" are switched off (middle position).
Now that we are properly connected, we can power up the vacuum
system. On the cathode controller, first make sure "filament" and
"degas" are switched off (middle position).
 Turn on both meters. The little LCD one measures high pressure, the
bigger LED one (shown right) measures low pressure.
Turn on both meters. The little LCD one measures high pressure, the
bigger LED one (shown right) measures low pressure.
 Gently open the main vacuum valve (which projects from the top of the
housing on the vacuum pump) about 10 turns. (Don't over-tighten
this valve either opening or closing it.)
Gently open the main vacuum valve (which projects from the top of the
housing on the vacuum pump) about 10 turns. (Don't over-tighten
this valve either opening or closing it.)
 Double-check that everything has been done correctly, then turn
the pump on.
Double-check that everything has been done correctly, then turn
the pump on.
 The fitting that connects the stainless steel vacuum hose to the dewar
has a plug with 2 O-rings around the outside:
The fitting that connects the stainless steel vacuum hose to the dewar
has a plug with 2 O-rings around the outside:
 The plunger has a rod on the inside which screws into the plug and can
then be used to pull the plug out.
The plunger has a rod on the inside which screws into the plug and can
then be used to pull the plug out.