Observing: Focus and Guiding
Hints for Field Acquisition
- At the start of the night it may prove useful to acquire some familiar
astronomical object, center it on the detector, and then reset the RA
setting circle. One can also note what the error is in declination.
- It is essential that you use current equinox coordinates when setting
the telescope: equinox 1950 coordinates will lead to errors of 1/4 of a
degree! There is an IRAF routine astutil package that can be used for
this purpose.
How to Focus

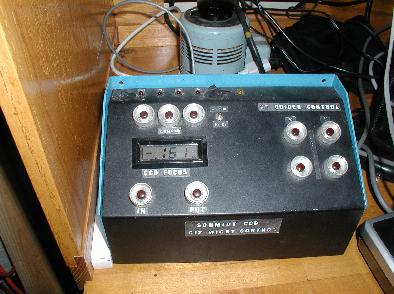
The focus box, currently located on the primary control area.
On the bottom left are the "in" and "out" button to adjust the focus.
On the right are the four buttons to adjust the stage for the guider
camera. The indicator shows the value for the focus.
The focus of the Schmidt varies with temperature, telescope
hour angle, and position on the chip. Generally most filters used in
the Schmidt are not parfocal, so offsets will be needed as you change
filters. Due to the large pixel scale of the Schmidt
(about 1.45 arcseconds per pixel), and normal Kitt Peak
seeing conditions, the PSF will often be undersampled (FWHM = 1.5
pixels, or less)
There is no automated focus routine on the Schmidt; instead here is the
routine:
- switch on the ILS camera, position a star to the leftmost edge.
- set focus to a starting value
- set up a 60 second exposure (make sure "Disable Exposure Timeout" is set
in voodoo), and start the exposure. Pause after 10 seconds.
- jog the telescope north, watching your star in the ILS. Change the
focus value (by steps of 50 or so). Expose another 10 seconds.
- the first jog should be big, subsequent ones small.
- when you have gone through all six 10s exposures, the chip
will read out and you can imexamine the image to determine the
best focus.
The focus changes a lot over the field of the chip, and it's a dome,
not a plane.
Remember to turn the gain down on the ILS when you are done!
Using the Autoguider
In general, pressing "Parameter" cycles through the different parameters
available for each task, and pressing "Value" cycles through the different
values each parameter can take. So a typical task consists of hitting the
task ie "Calibrate", hitting "Parameter", selecting a "Value", then hitting
"Parameter" again to choose the next parameter, etc, then hitting the task
button once more at the end to do the task. At any point, "Interrupt"
will stop the process.
Calibrating the Guider
One thing to remember is that the guider really does not know about
the effect of cos(dec), so if you have an object at high dec, you may want
to (re-)calibrate the guider at the object.
- Find a reasonably bright star in the ILS camera, and move it to the
box greasepenned onto the ILS monitor.
- Turn down the ILS gain, and switch the mirror to guide.
- Hit "Calibrate". Use the following options:
- Mode: Full-Menu gives you all the choices
- Exposure Time: you can bump this up if it is a faint star.
- Relays: you want this to read 1111 (ie all 4 directions)
- Calibrate Time: try 20 seconds, 30 if you are near the pole
- Hit "Calibrate" again -- it will acquire the star, move in all 4 directions, each
time reaquiring the star to calibrate the offset. At the end, it will show the
results on the SBIG display.
Operating the Guider
- Again, find a star in the ILS, move it to the greasepenned box,
turn down ILS gain, and switch mirror to guide.
- Hit "Track". Important options for track are
- Mode: Full-Menu gives you all the choices
- Relay Tone: no, it's annoying
- Exposure: again, bump it up for a faint star
- Guide To: "Sel Star" (ie it will select the star, then ask for confirmation)
- Aggres (X/Y): Aggressiveness in correcting. <1 undercorrects, >1 overcorrects
- Exposures to average: set it to average over a few so it doesn't overcorrect
- Hit "Track" again -- it will find a star, then ask for confirmation. Hit the
"Value" button to accept it. The telescope should now begin guiding.
Guiding Tips
- Make sure the guider telescope is not
vignetted by the dome. It's entirely possible for the main telescope
to be unvignetted, but the guider vignetted.
-
Note that the ILS is very sensitive; if the gain is up, don't
shine light over near the ILS camera! Also, be very sure to turn the
ILS gain down when moving the guide mirror, or the telescope itself.
- You can adjust parameters such as the exposure time and the
aggresiveness on the fly for better results.
- The complete SBIG Guider Manual is available on the manuals shelf
downstairs.
Table of contents
Last updated: 2/16/04
