Shutter and Filter Wheel
The filter wheel/shutter has a 4 inch shutter and holds 8 4X4 inch
filters, or smaller sizes with adapters. We have 4-inch ``Harris''
UBVRI filters on loan from KPNO; their descriptions and tracings can
be found at
ftp://ftp.noao.edu/kpno/filters/4Inch_List.html.
The filters can be found in the plate-loading room on the observing floor.
The filter position can be controlled using the CCD computer. The
shutter can also be opened and closed manually using this same method.
Changing filters
The filter wheel must be removed from the shutter/wheel mount on the
telescope to install filters. The wheel will hold 8, 4X4 inch filters
as well as 8, 2X2 filters when using the adapters for the small
filters.
Note: Please handle these filters carefully and use extreme caution when
removing and inserting the wheel in to its holder. These are very
expensive filters and we do not have any spares.
Removal and insertion of wheel
The filter wheel is large and can be heavy when all the filters are
installed. The filters can only be changed when the telescope is
at zenith. Otherwise, the filter wheel could suddenly fall out,
with unfortunate results.
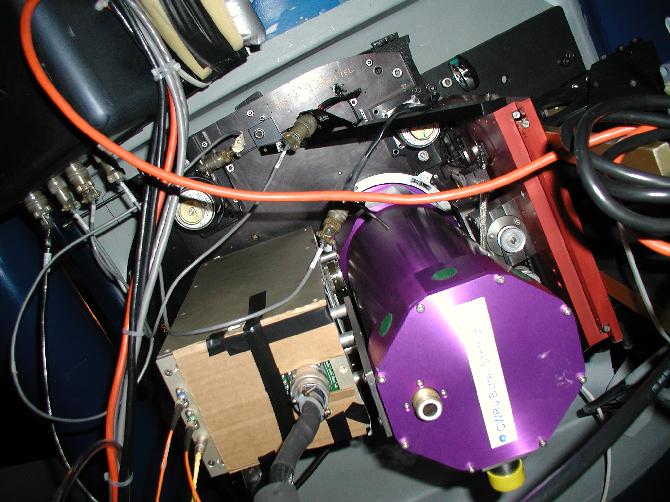
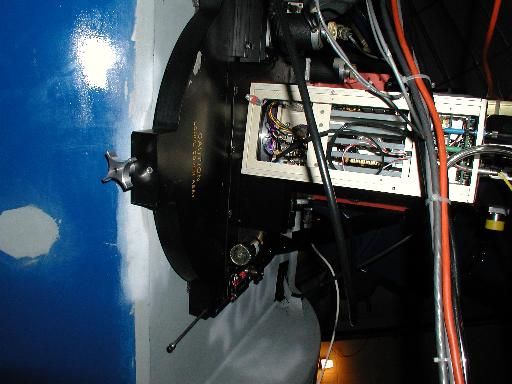
Two images of the telescope CCD and filter wheel. The first
view is from directly in front of the CCD, the second is to the side.
The CCD dewar is clearly visible as the purple object. The filter
wheel is the black semi-circular object closest to the telescope side.
The brass box with the stylish piece of cardboard is the CCD
controller, with its circuit boards.
- Unscrew the knob that secures the access door. Carefully pull the
door up by the knob along the support rods and lay it down. It does not
remove, but must lay well over the dewar to permit access to the wheel.
- Carefully pull the wheel up and out of the holder. You will notice that
the center of the wheel facing you at this point, has a round center section
with metal arcs milled into it. This is the position encoder system. The
encoder disc must face the dewar when installing the wheel.
Be careful not to damage this.
- Lay the wheel encoder surface down on the table in the
filter room covered with Kay
Drys. This protects the encoders.
- In the Schmidt filter room box is a container with screws and an
allen wrench which you need to remove the filter holding frames.
These frames are used to hold the 4X4 filters as well as the adapters
for the 2X2 filters. There are special rotated 2X2 adapters for the
Schmidt. These will allow the filters to be rotated so they line up
with the rows and columns of the CCD.
If there is a question about which side must face the dewar,
hold the adapter up and make sure the filter lines up with the
rotation of the dewar while holding the holder square with the wheel.
Most broadband filters can be placed either way, but
narrow-band interference filters must be placed in so that their
reflective side faces the telescope (the black side of the filter wheel).
An image of a full filter wheel. The 2x2 filters are the small
rotated filters. Bonus points if you can identify all of the filters.
Note: We have had light leaks around the edges of 2X2 filters from the
coatings of the filters not going to the edges. If you see this problem
you will have to cover the edge of the filters with black tape. If you can
see through the filter, hold it up to the light and you can see if there is
a problem.
- Insert your filters and hold them in place with the frame.
There are numbers engraved on the wheel which determine the filter
position, please keep track of these numbers and what you have mounted
so this can be entered into the computer. Please note that the frames
will only go one way. and the screw holding the frames must not extend
above the frame work of the wheel. You can use strips of cork on the
frames to protect the filters.
NOTE: DO NOT USE ANY FORCE ON THE SCREWS HOLDING THE FRAMES, OR YOU
MIGHT BREAK THE FILTERS. THE SCREWS ONLY NEED TO SET FIRMLY.
- After all the filters are in, if they are dusty,
blow off the filters using the compressed air just before
installing the filter wheel.
- Carefully lift the filter wheel. Open the access door if not left
open. insert the wheel with the center encoder facing to the dewar.
You do not need to pay attention to the position of the filter numbers
on the wheel as the set up will take care of position. Rotate the
wheel by hand until the detent lockes it into place.
- Carefully lift the door and slide it down the rods. Secure it
with the knob.
- Press the white button ``STD reset" on the 4X4 filter interface
power supply box. This will reset the shutter and filter wheel to it
starting zero point. Any time the filter wheel is removed and
replaced, press the reset button.
If at any time you feel the shutter is not working right, press the
``STD reset" button. This will zero the shutter.
Controlling the Filter Wheel and manual operation of the shutter
We control the filter wheel from a kermit window on emu. Make sure you are logged
into emu as root, then start kermit and issue the following commands:
- set modem type none
- set line /dev/ttyS3
- set carrier-watch off
- set speed 1200
- set parity even
- connect
Now you can talk to the filter wheel; commands are summarized below. To quit kermit,
type Cntrl-\ followed by C.
Note that it is important to query the filter wheel position every
time the power is turned on; querying the filter wheel turns off the LED which senses the
filter position --- otherwise the LED's light leaks onto the CCD.
If you need to operate the shutter manually
this can be done here as well. Note
that the VOODOO control software is unaware of these manual
operations.
Table 1. The filter wheel commands.
| Request |
You Type: |
| What's the filter wheel's current position? |
pfil? |
| Change to filter 5 |
5 pfil |
| Open the shutter manually |
open |
| Close the shutter manually |
close |
Troubleshooting the filter wheel
- If the shutter hangs, try a hard reset (white button on grey
control box) and a soft reset (schcom 'pfil?').
- If the filter wheel hangs and gives a ``Schmidt filter interface
timeout'' message, try schcom 'coldstart' 2--3 times. If this doesnt
work, check that kermit is still working.
- If the filter wheel hangs with an ``Error -- filter wheel
solenoid did not disengage'', try re-seating filter wheel in holder.
Table of Contents
Last Updated: 10/6/02